Written by Agnes, staff member, Keshen Goodman Public Library
Have that summer’s evening feeling any time of year with twinkling tin can lanterns! With a little preparation, you can turn an empty can into a beautiful lantern in about 20 minutes. Put your creation on the balcony to admire at night, or on your patio table to provide some centrepiece décor during the daytime.
Note: This craft is fun for all ages, but children should be supervised and helped by an adult.

We challenge you to kick-start your creativity by creating your own tin can lantern.
What you'll need:
- Hammer
- Nails
- Cleaned empty tin can(s)
- Paper to draft your designs
- Pencil/marker
- Tape
- Scissors
- Towel
- Tea-light candle(s)

Optional supplies:
- A shoe box-sized box can help to hold the can steady while you work
- Paint to add some additional decoration
Preparation:
Fill your can to within a few centimetres from the top with water and pop it in the freezer for several hours or overnight. Being full of ice helps to stop the can from denting while you work on it. When the water freezes the can might pop out at the bottom, but you can just pound it flat with your hammer after the ice melts.

When you’re ready to begin working, take the can out of the freezer about 15 minutes before, to let it warm up a bit and then dry it with a towel to make it easier to handle. Remember to make sure your hands are dry before taking the can out of the freezer.
Tip: If you work outdoors, you don’t have to clean up the ice as it breaks and melts while you’re working.
Step 1
Draw a design that you like. Make sure that it is a size that will fit on the can, or you can save the label from the can and draw your design on the back of that. Simple designs—like a star or a heart—look nice, as do swirls and star-burst type designs.
Tip: You may also have a fun cookie cutter shape that you can trace!

Step 2
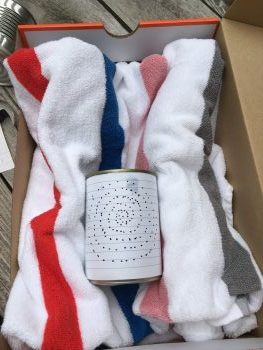
Tape the design to the prepared can and then tuck the can into a box with the towel wrapped all around the sides to support it and hold it steady.
To keep the paper from falling apart while you work, you can cover the whole area of the design with tape before taping it to the can, a little bit like laminating it.

Step 3
Punch holes in the can by hammering the nail into the can, try to space the holes evenly along the lines of your design. Use whatever size nail you have or use two different sizes of nail for added detail! Once you've punched all of the holes, remove the paper from the can.


The bumps on the can might make the nail slide and the holes go in slightly different places, but remember; imperfect is perfect.
Step 4
Add a candle and enjoy! Whether you put your cantern inside or outside, it's sure to add a touch of summer whimsy to your home.

 Battery operated candles are safer and work just as well as wax ones for this project.
Explore more templates here, opens a new window, and get inspired!
Share your tin can lantern creations on social media using the hashtag #KickstartCreativityHfX


Add a comment to: Kick-Start Creativity: Tin Can Lanterns