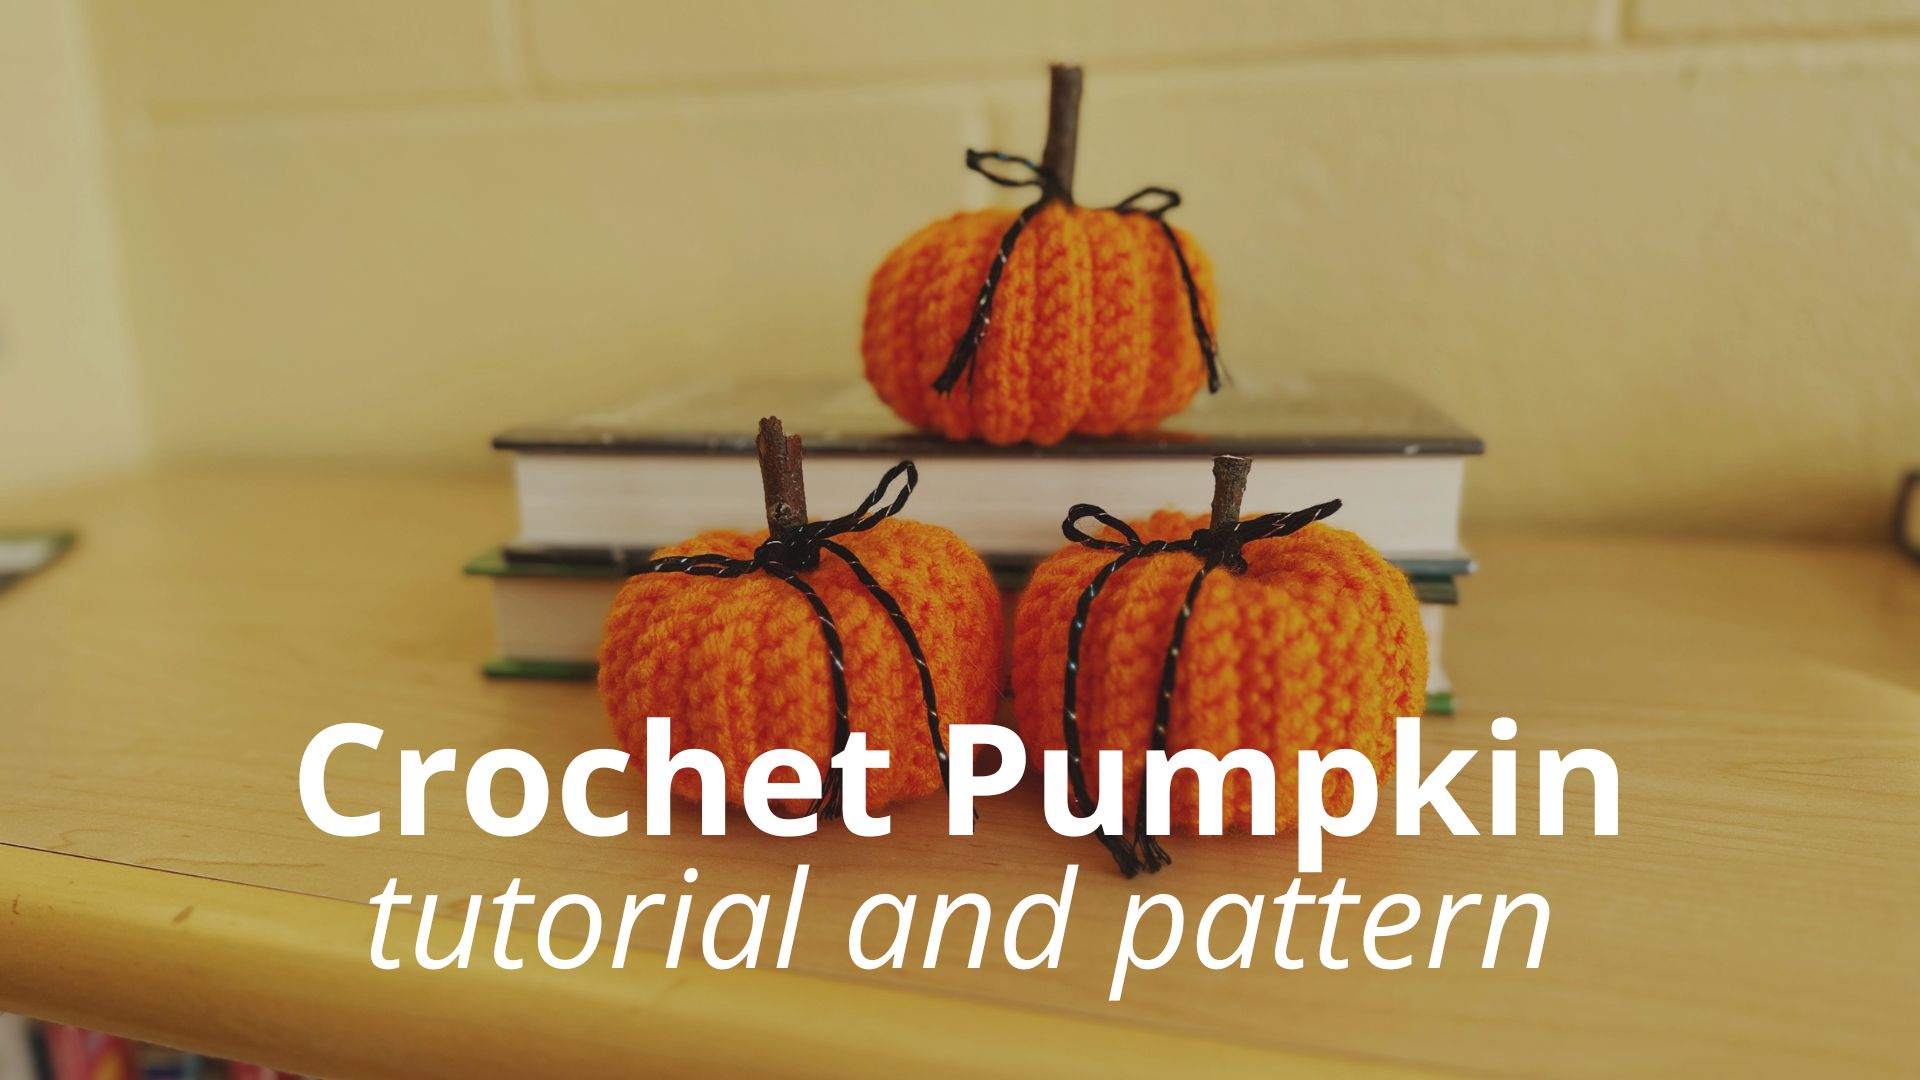
Do you love the fall? Do you love to crochet? We have the perfect thing for you! With this easy, free crochet pumpkin tutorial and pattern, you can learn to crochet your very own pumpkin! It’s the perfect thing to add to your fall decor. While this pattern is for beginners, you won’t learn how to crochet here–basic crochet skills are required! But don’t worry—at the bottom of this post, you can find some great books, resources, and programs available through the Library. In this post, you will find a photo tutorial showing you the steps involved in crocheting your own little pumpkin! After the photo tutorial, you will find a text pattern, if that is easier for you to follow.
About This Tutorial and Pattern
Finished Pumpkin
Supplies and Materials
- Yarn:
- Soft Classic Solid Yarn by Loops & Threads
- Medium weight (4)
- Acrylic
- Hook:
- 5.5 mm (US size I)--It's best to use the hook size recommended on your yarn label!
- Tapestry or yarn needle
- Scissors
- Cinnamon stick or wooden stick
- Twine or string
- Stuffing:
- We used polyfill, but you can use anything, such as scrap yarn!
- Hot glue gun and glue (optional; not pictured)
Terms and Abbreviations Used
In this tutorial and pattern, we use US crochet terms:
- Stitch (st)
- Chain (ch)
- Single crochet (sc)
- Back loop only (blo)--you make your stitch through only the back loop of the stitch instead of both loops
- Fasten off (fo)
- *...*: repeat what is between the stars
Crochet Pumpkin Photo Tutorial
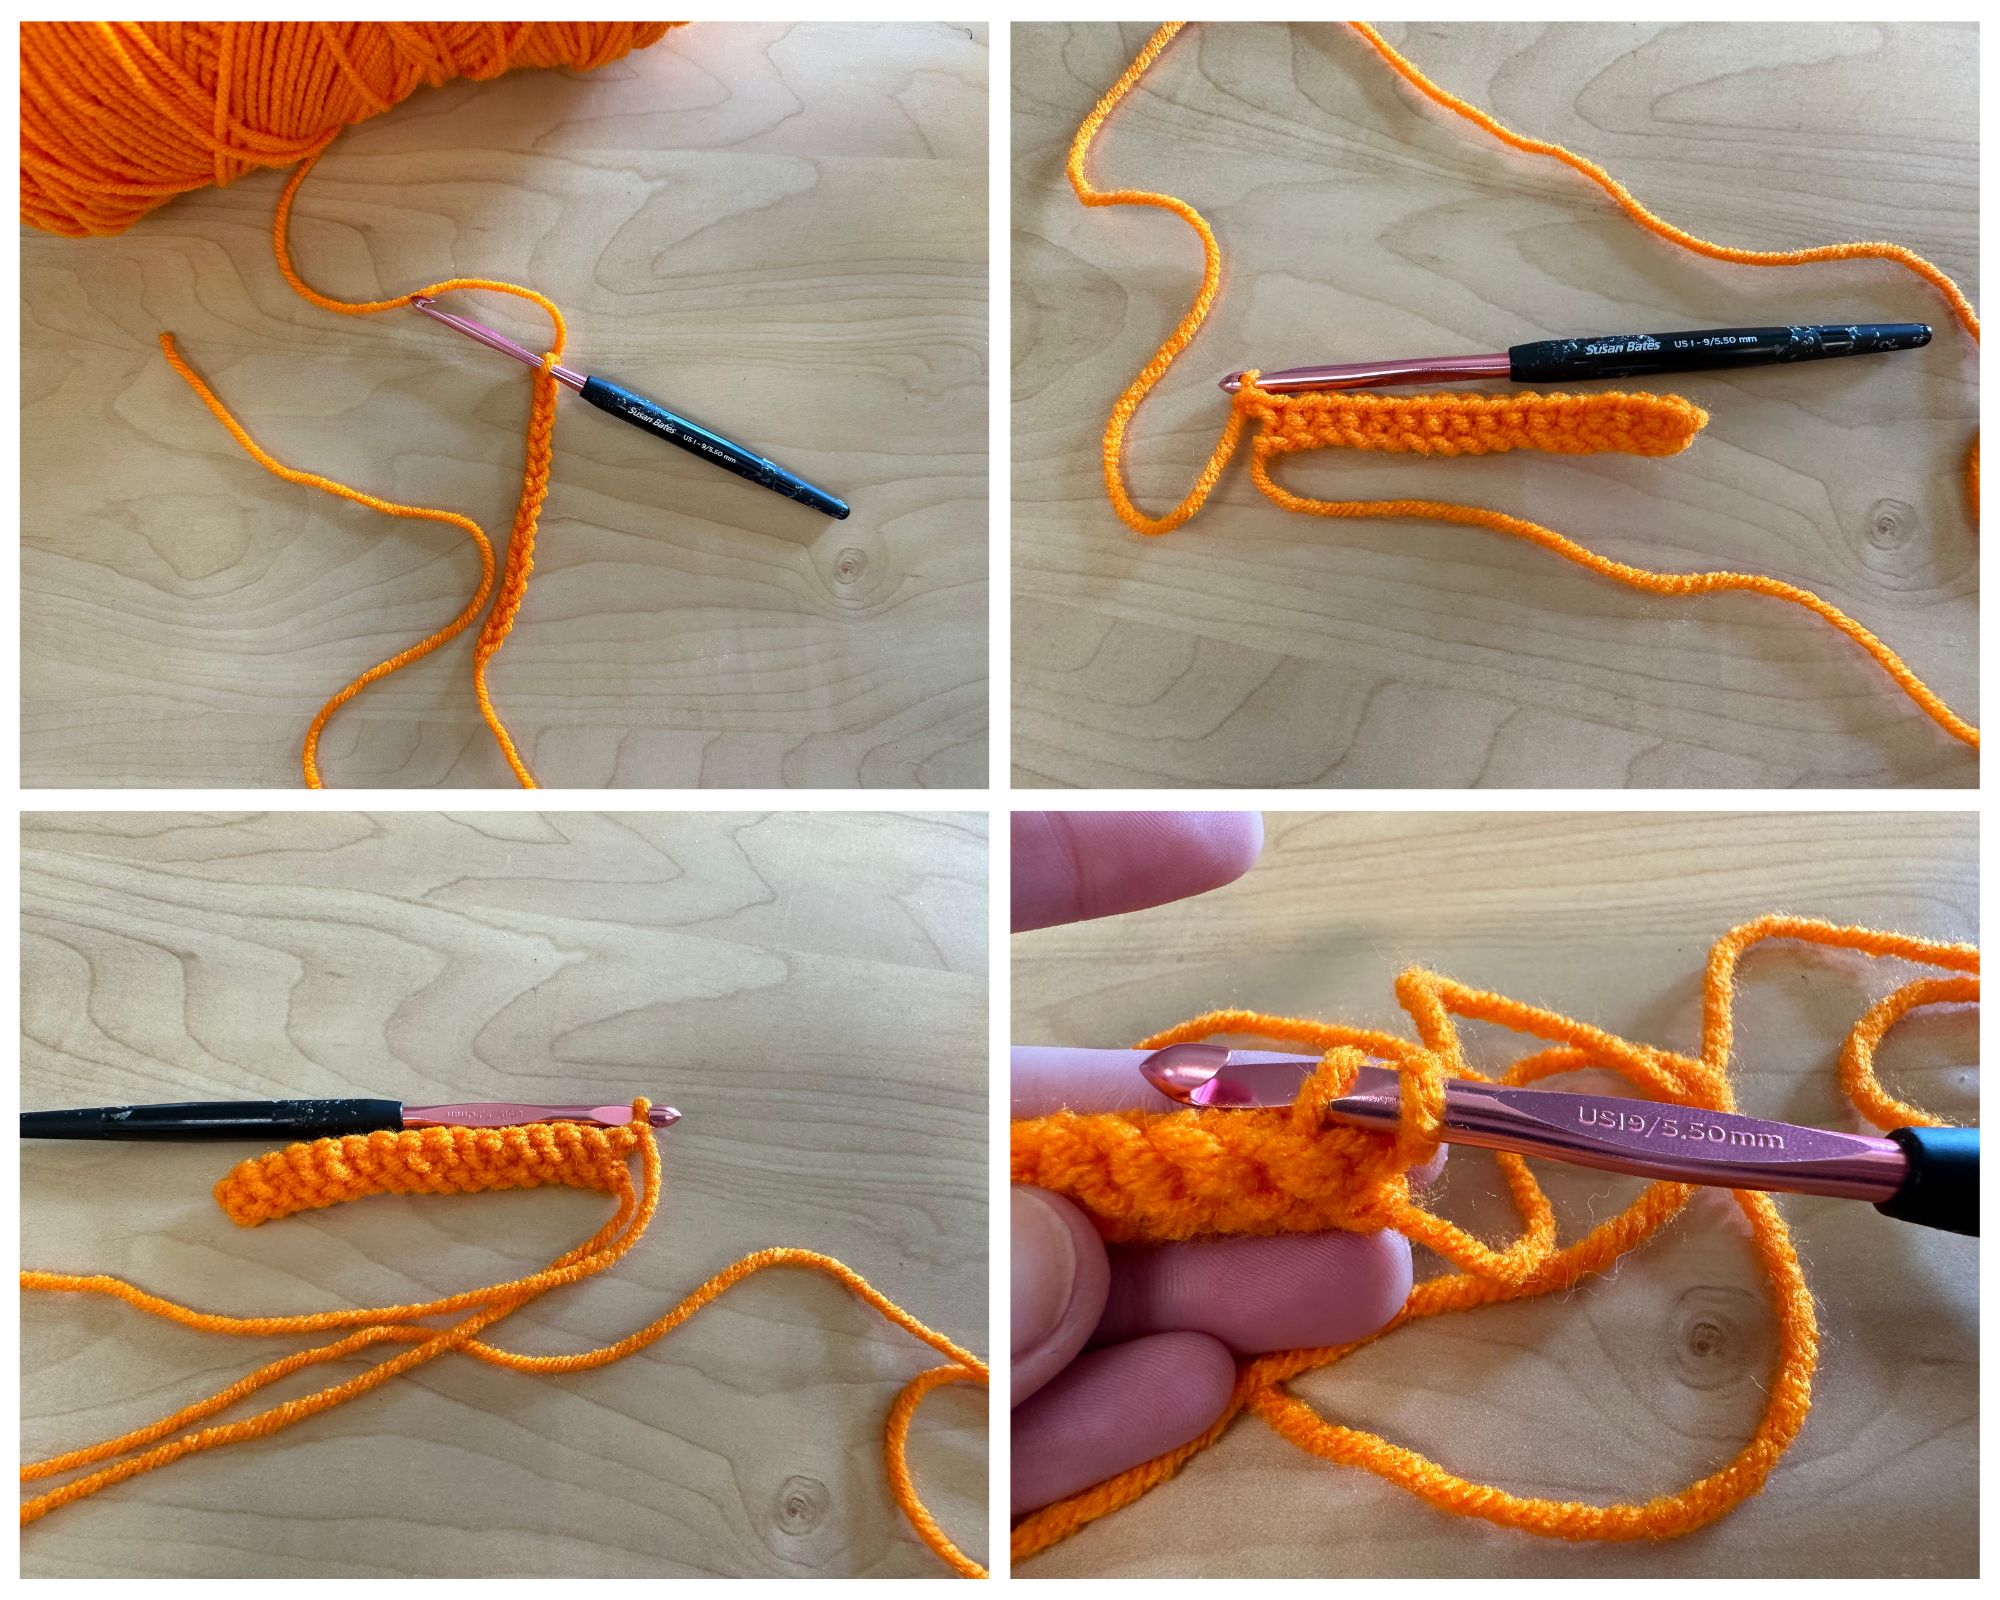
Make 16 chain stitches, leaving a long tail. Then, in the second chain stitch from the hook, make a single crochet stitch. Continue making single crochet stitches across to the other side (15 stitches).
Make another chain stitch, then turn your work. Now, working in the back loop of each stitch only, single crochet across to the other side (15 stitches).
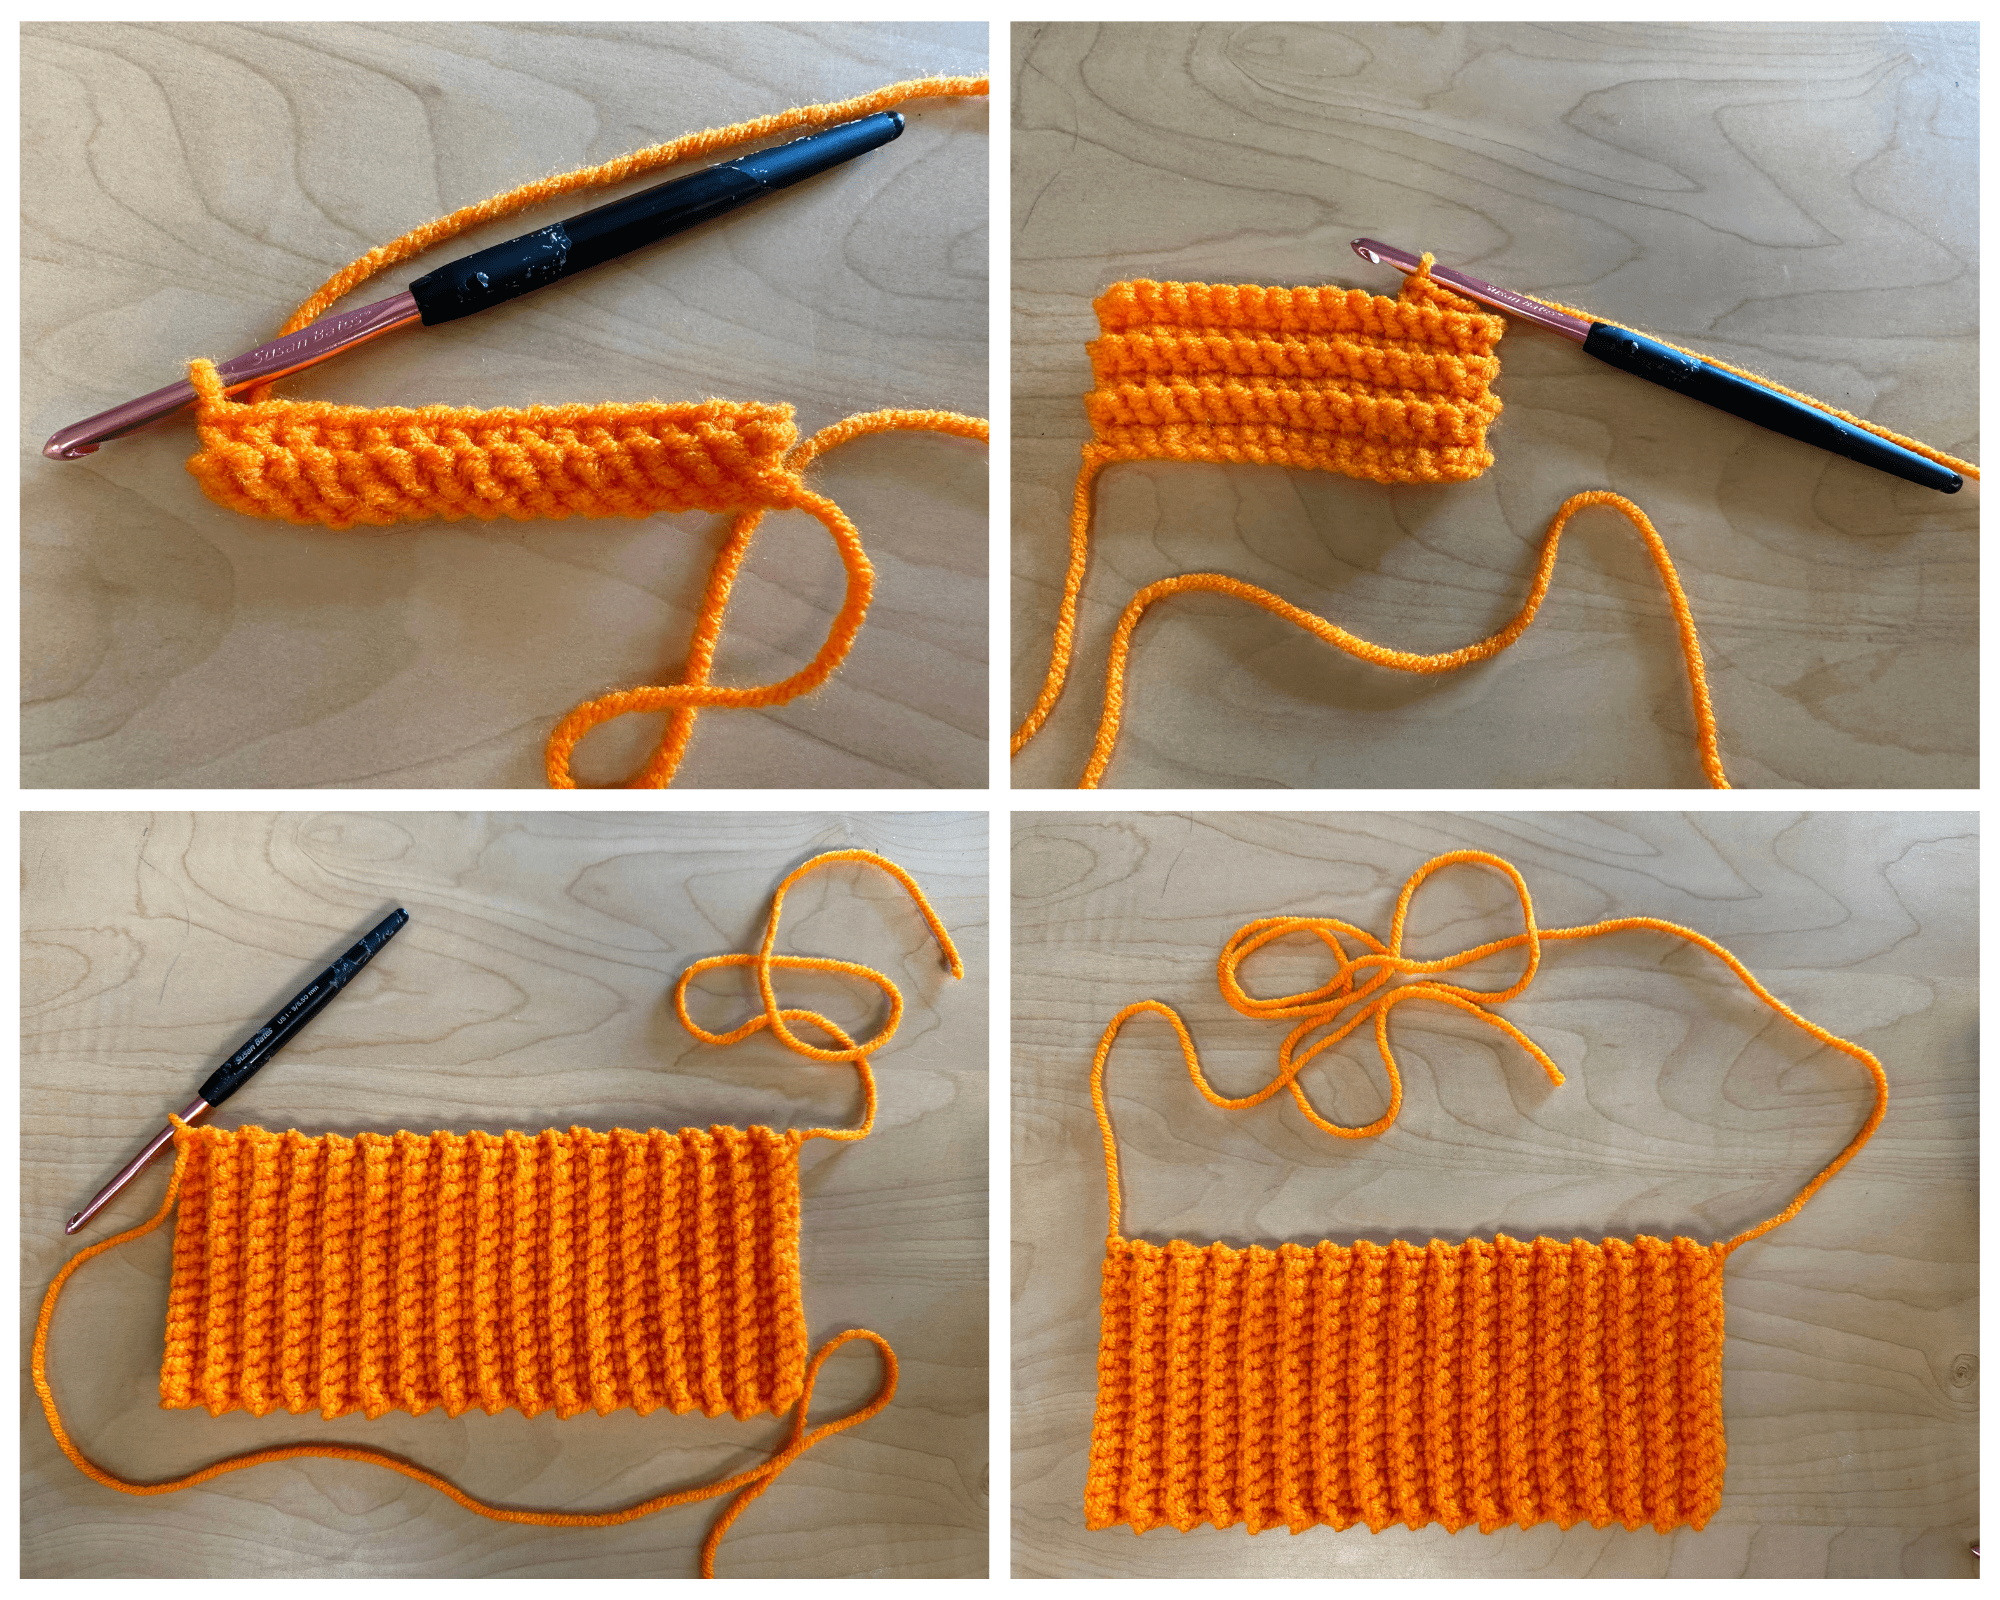
Make a chain stitch and turn your work. Continue single crocheting back and forth across your work, in the back loop only, for a total of 34 rows.
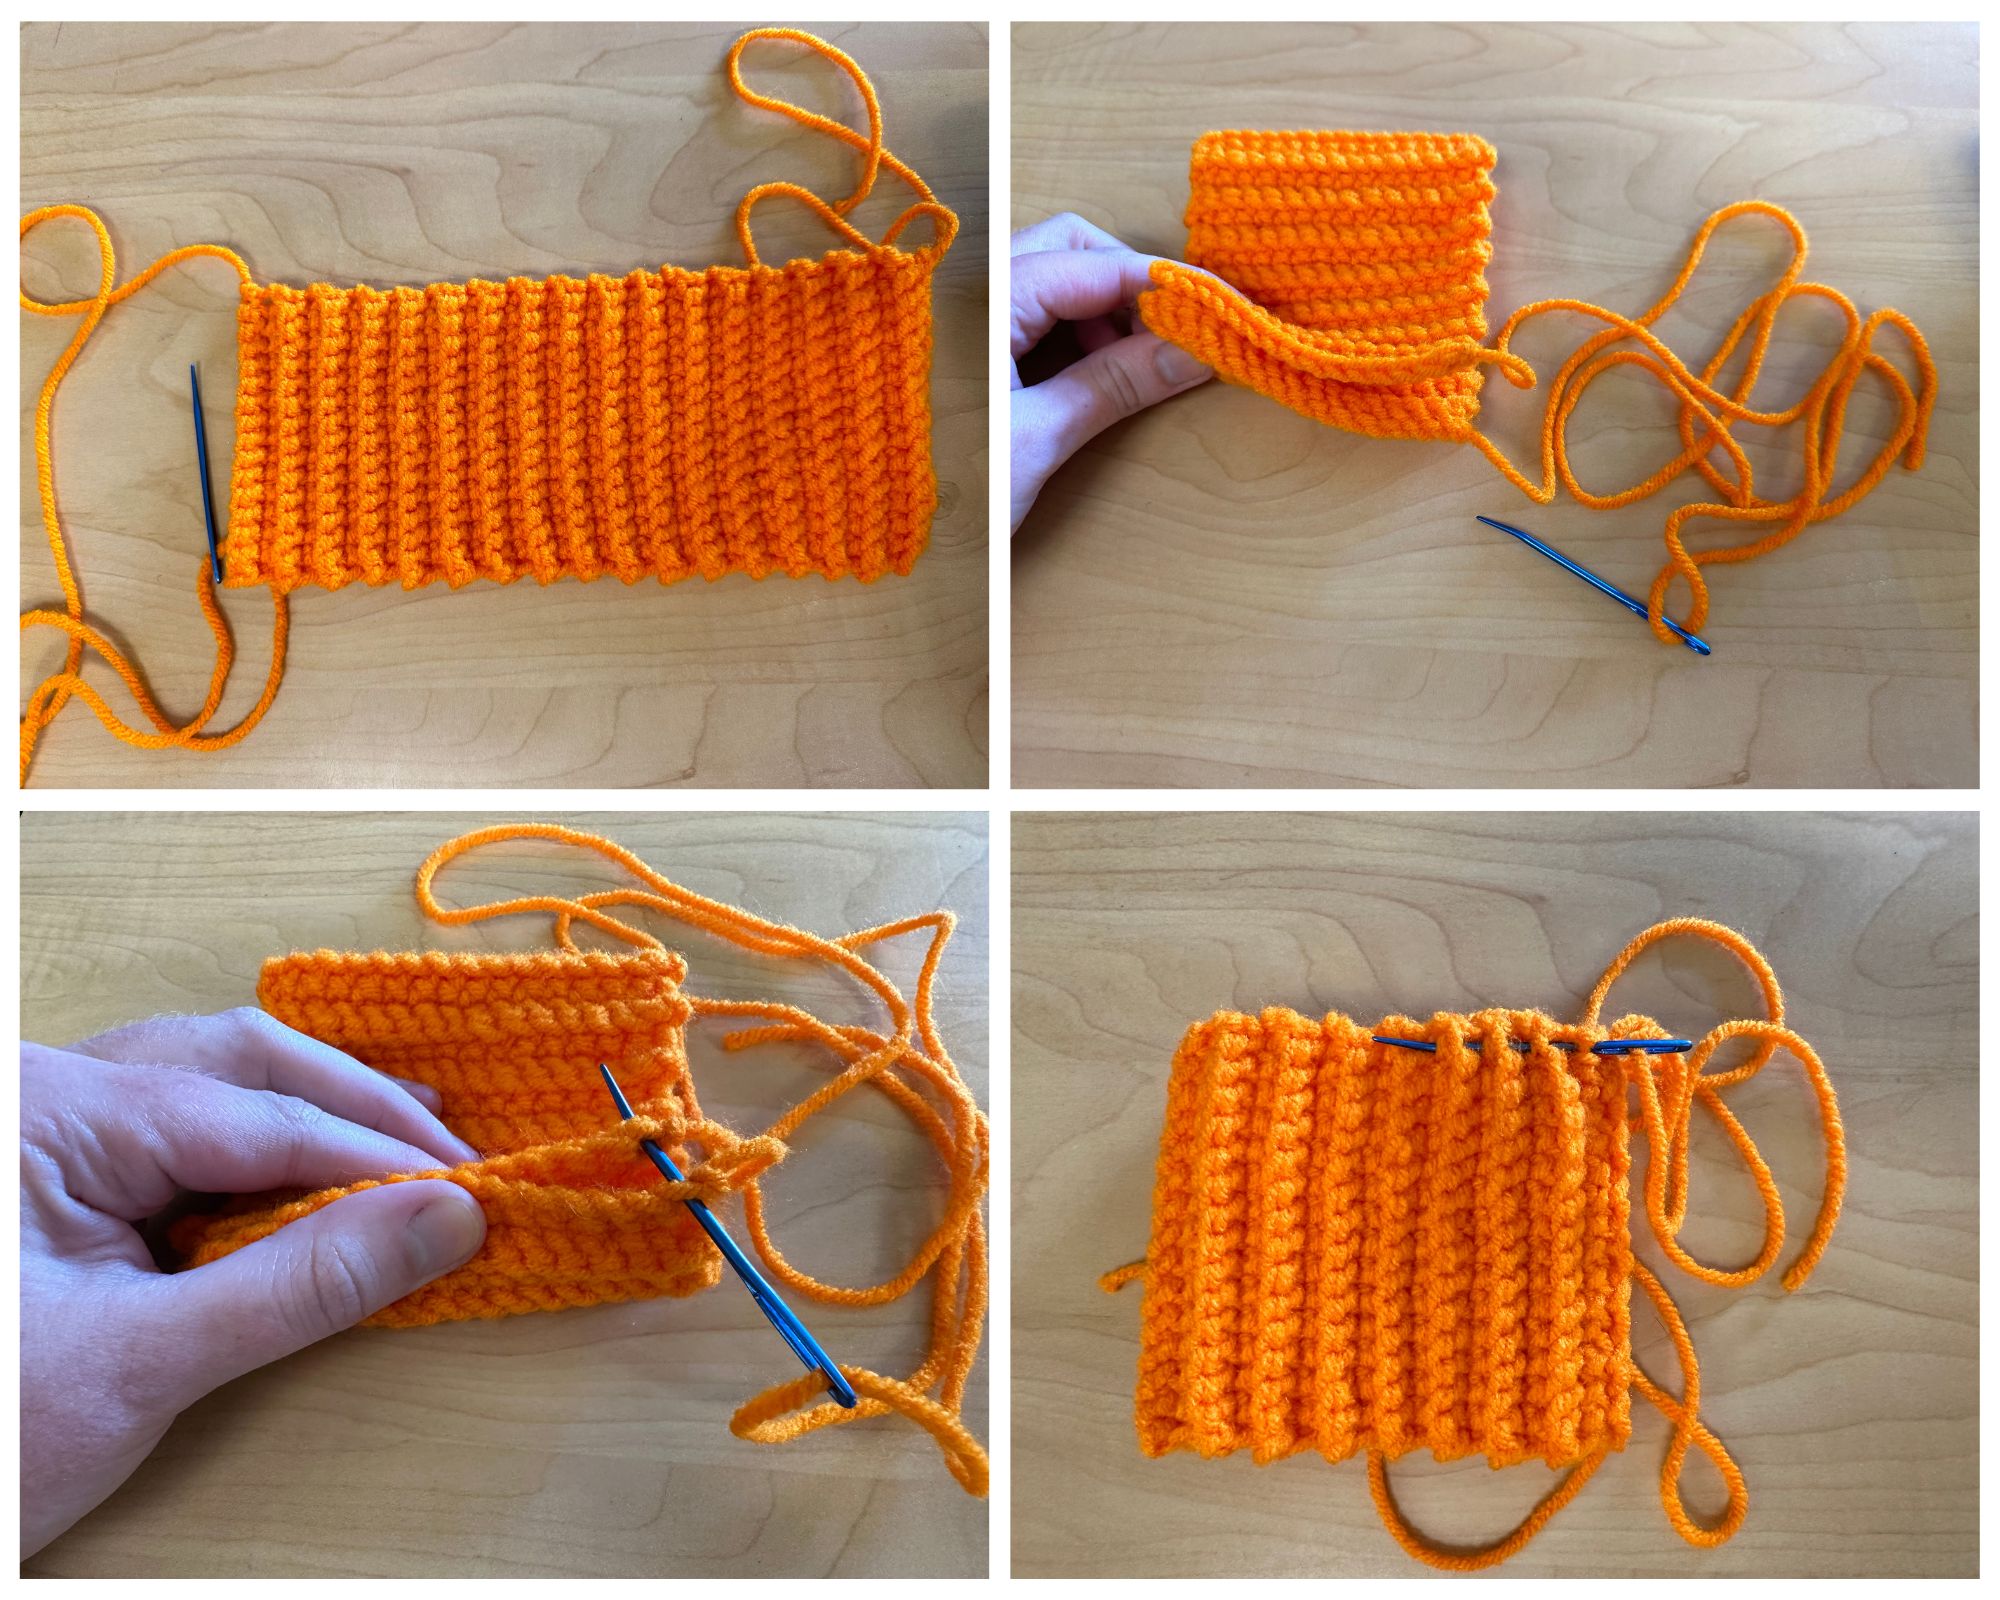
When you've finished your rows of single crochet stitches, make sure that the yarn tails are on the same side of your work. Next, take the corners with the tails and put them together. With a tapestry or yarn needle, sew the short sides together.
Now your work will look like a tube! Now sew one of the ends shut. Weave your yarn and needle in and out around the opening.
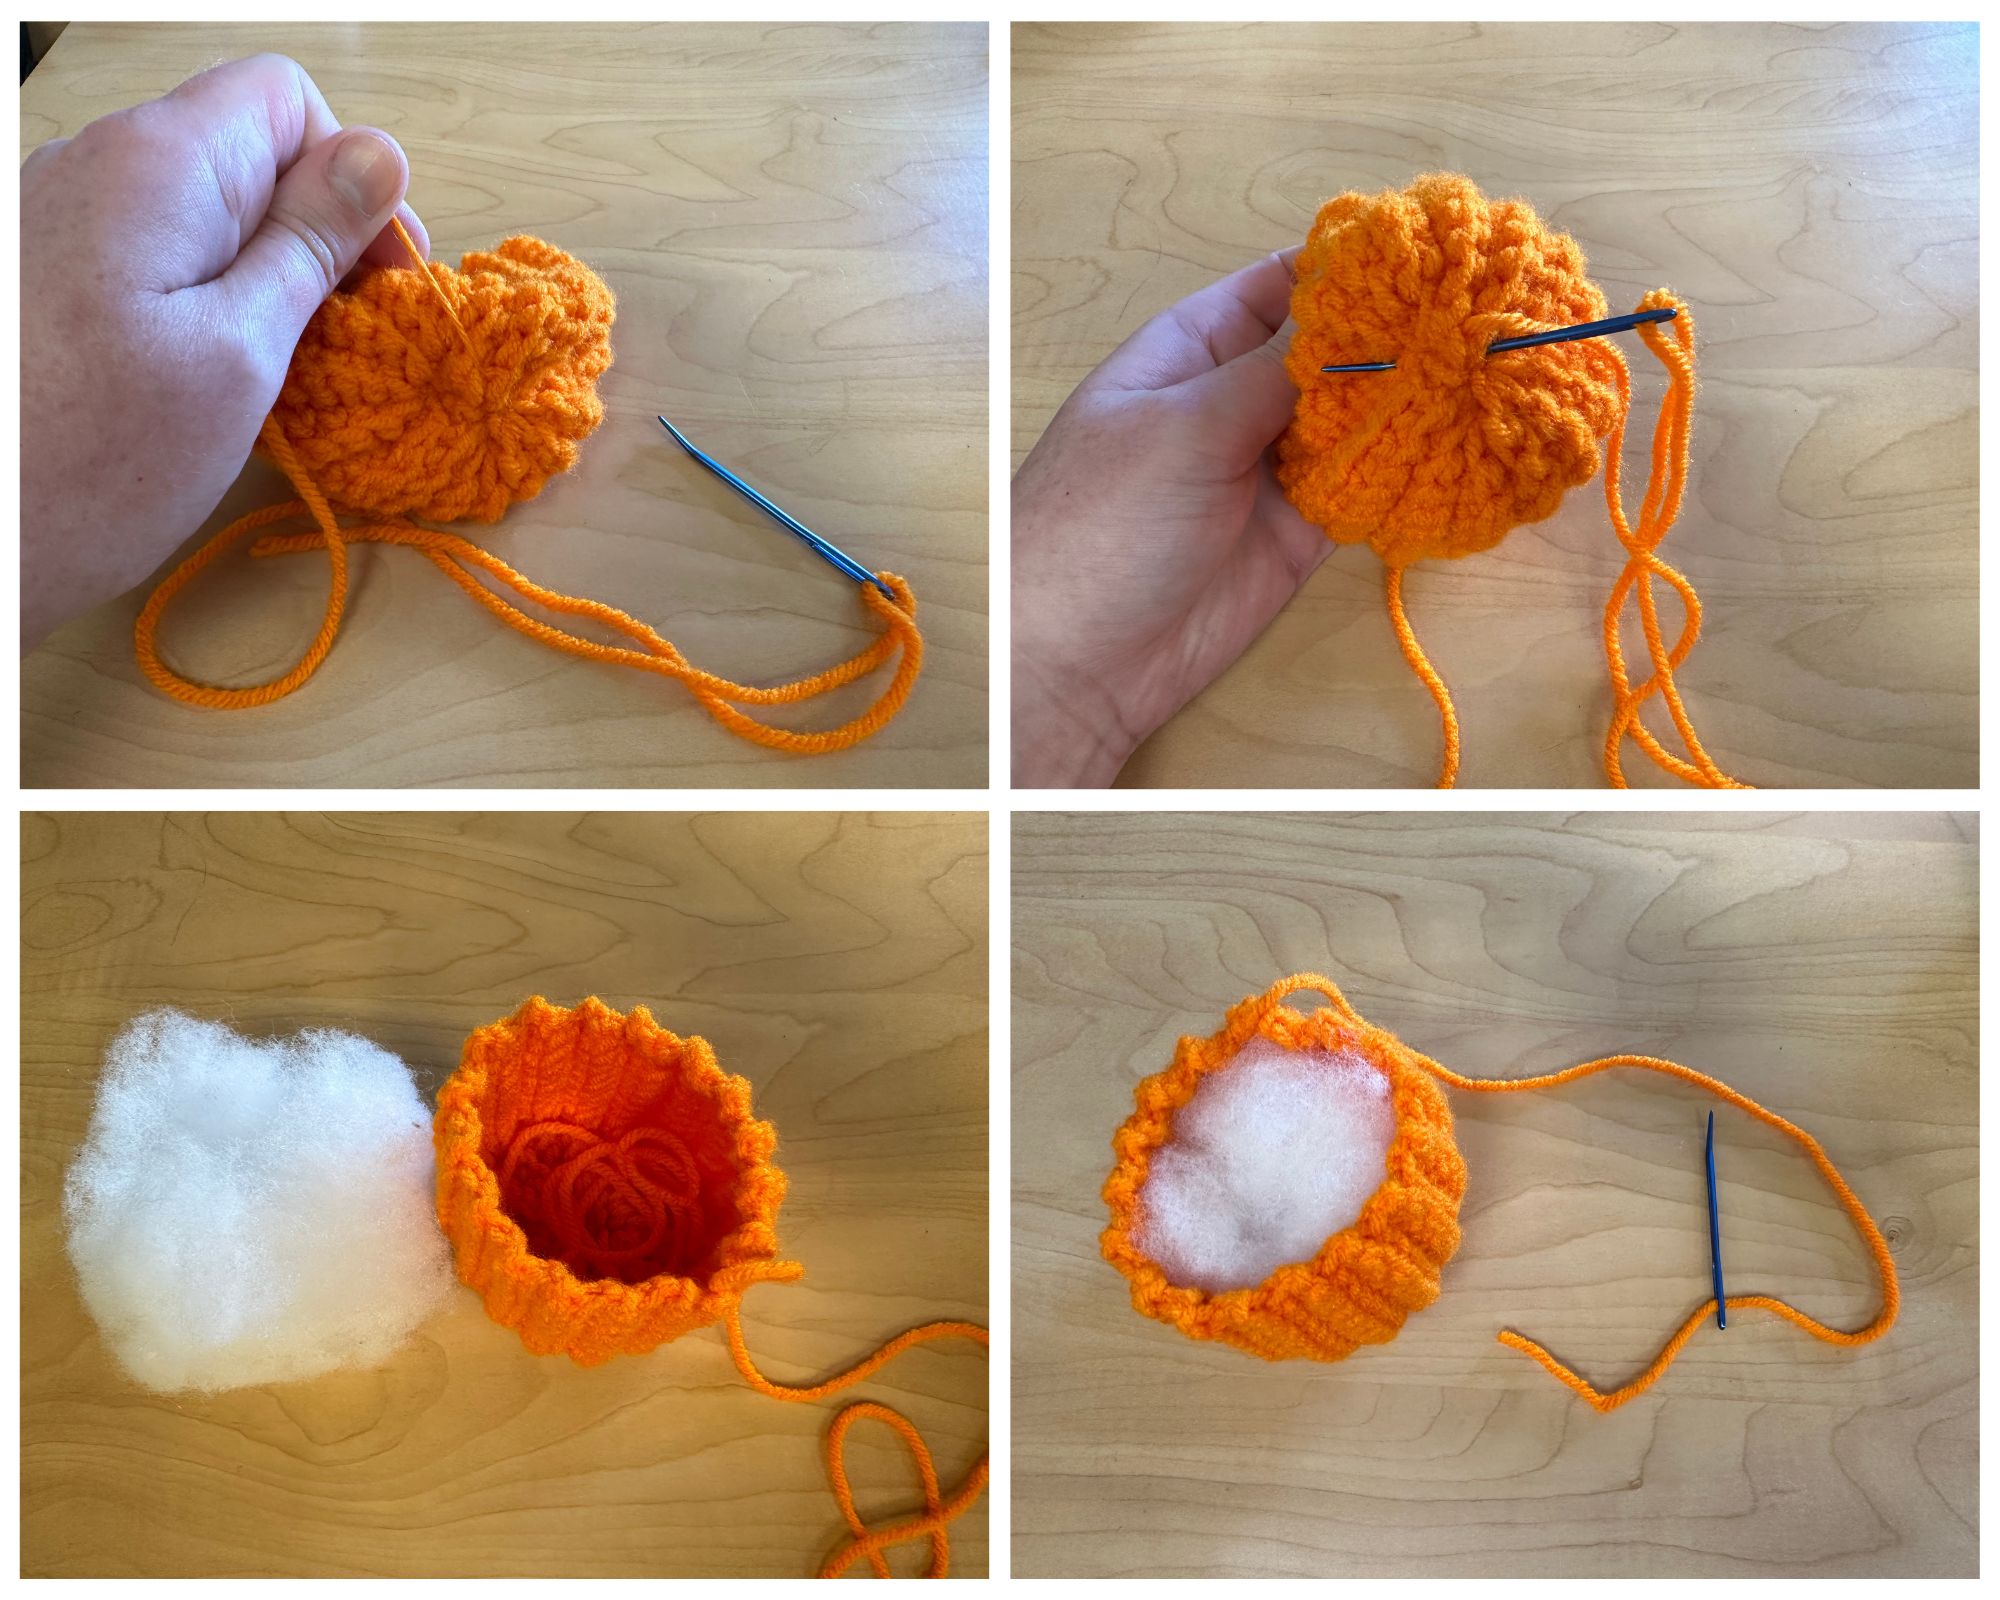
Then, pull the yarn tight, cinching the opening closed. Sew closed any remaining openings. Take your needle and pull the yarn tail through to the inside of the pumpkin.
Next, grab some polyfill (or whatever you decide to use!) and stuff your pumpkin.
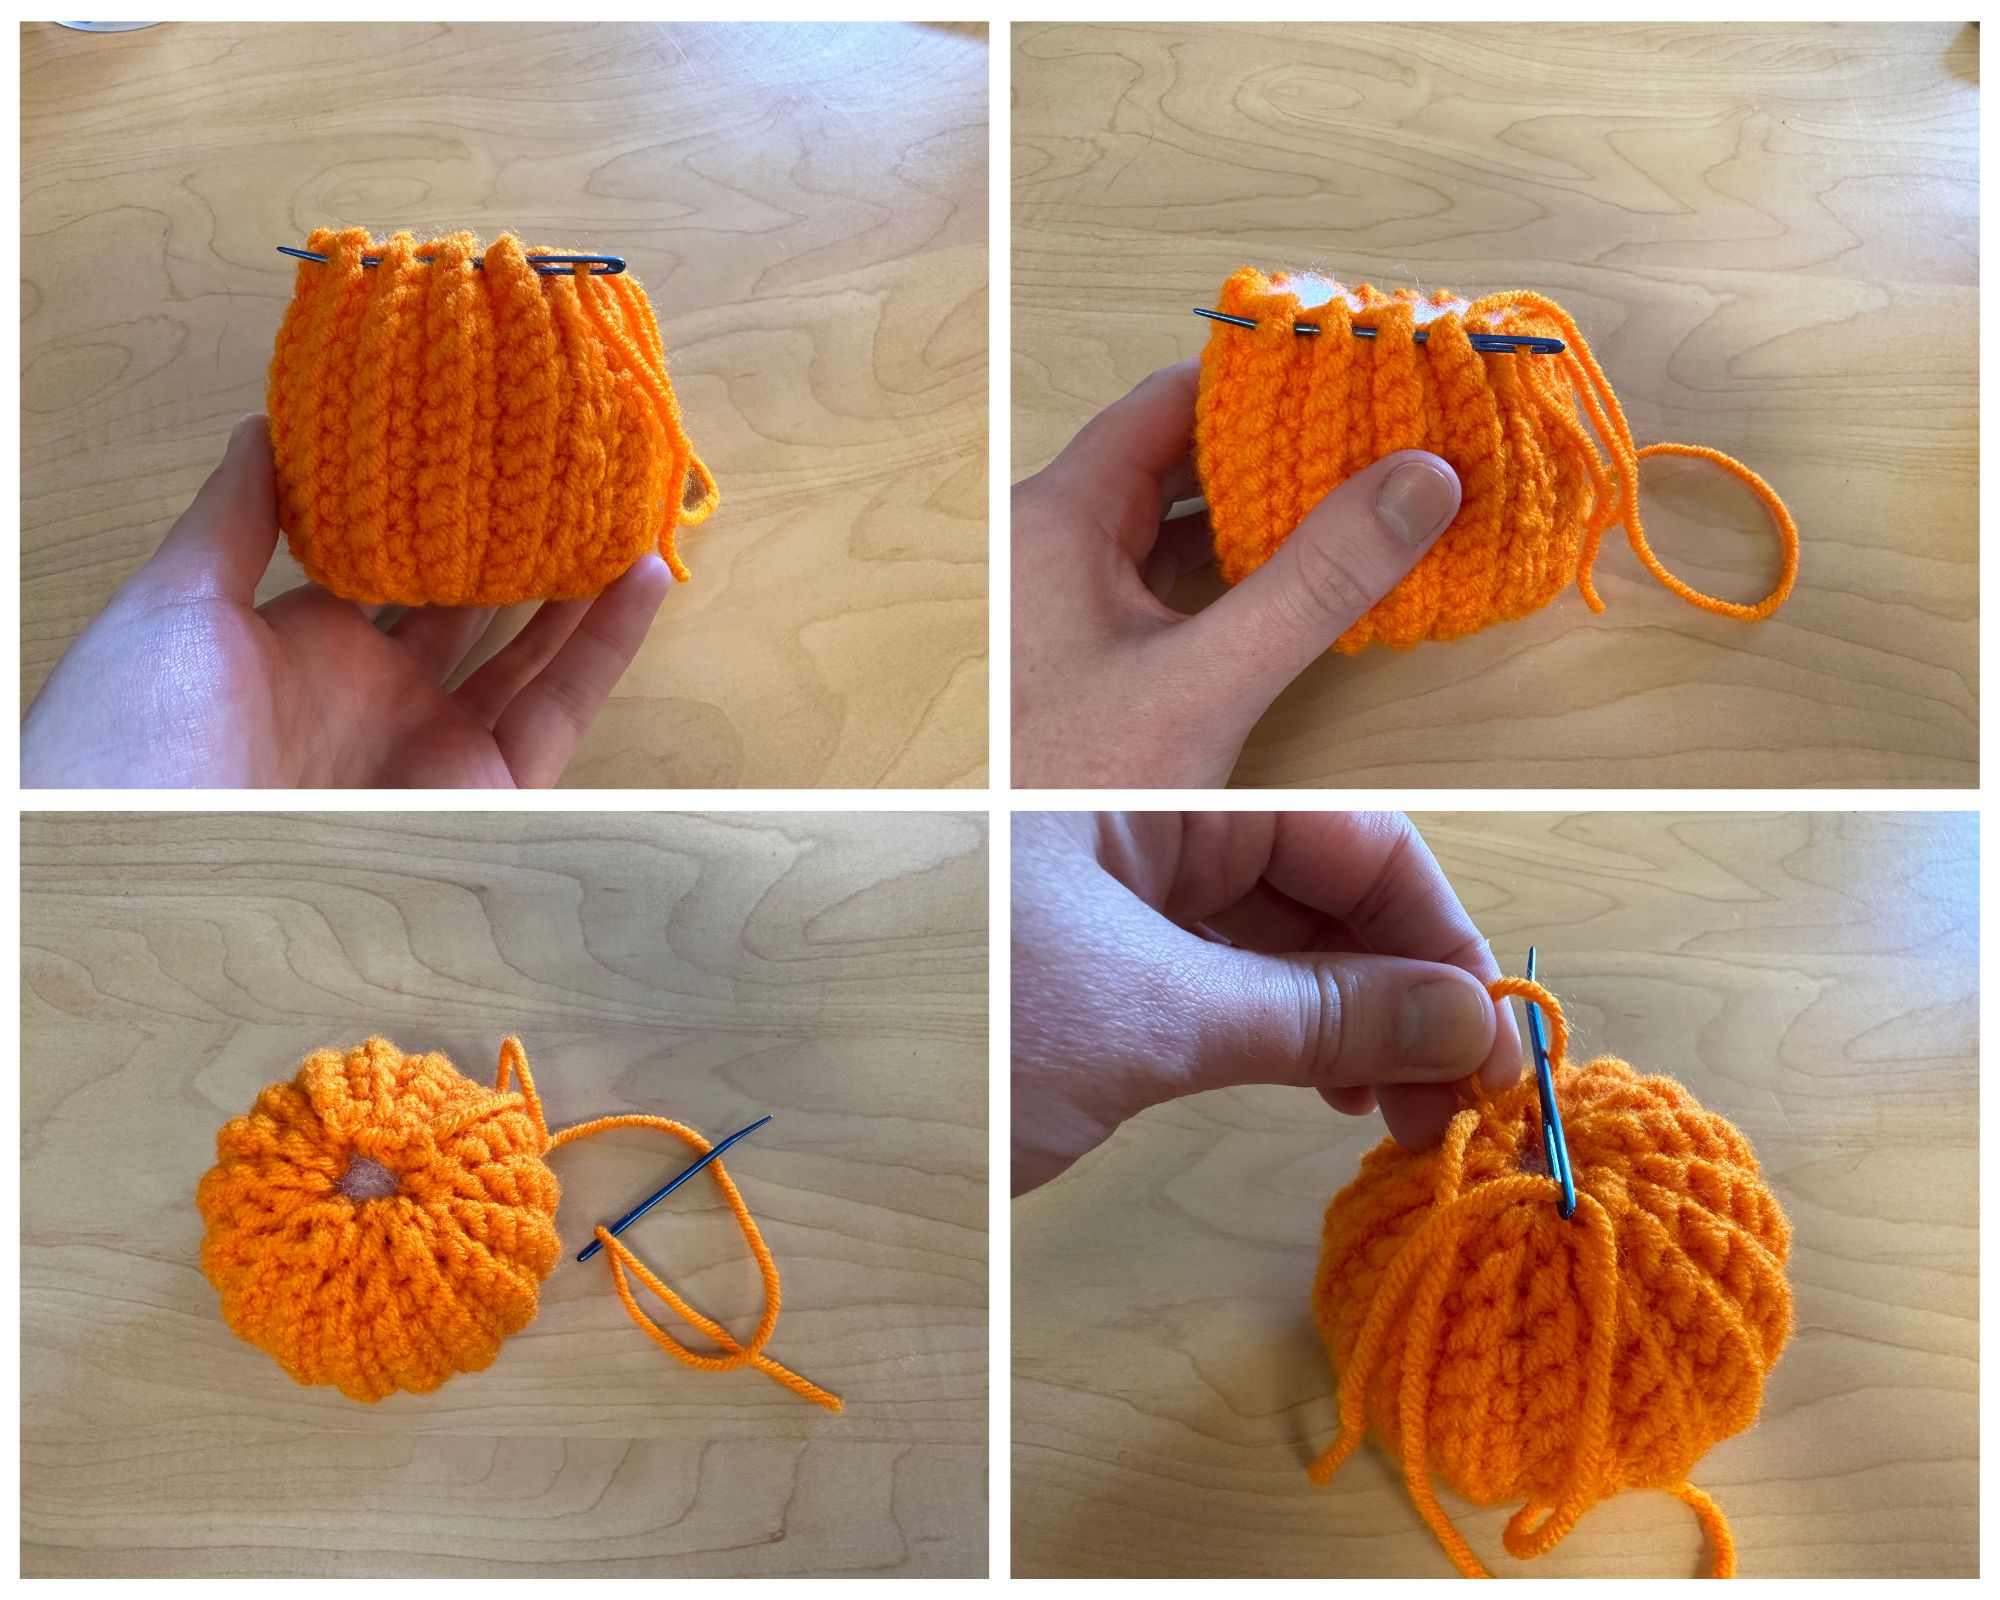
Next, sew the top closed. Like with the bottom, weave the needle in and out around, pull it tight, and fasten it off. Do not sew closed the remaining hole/opening.
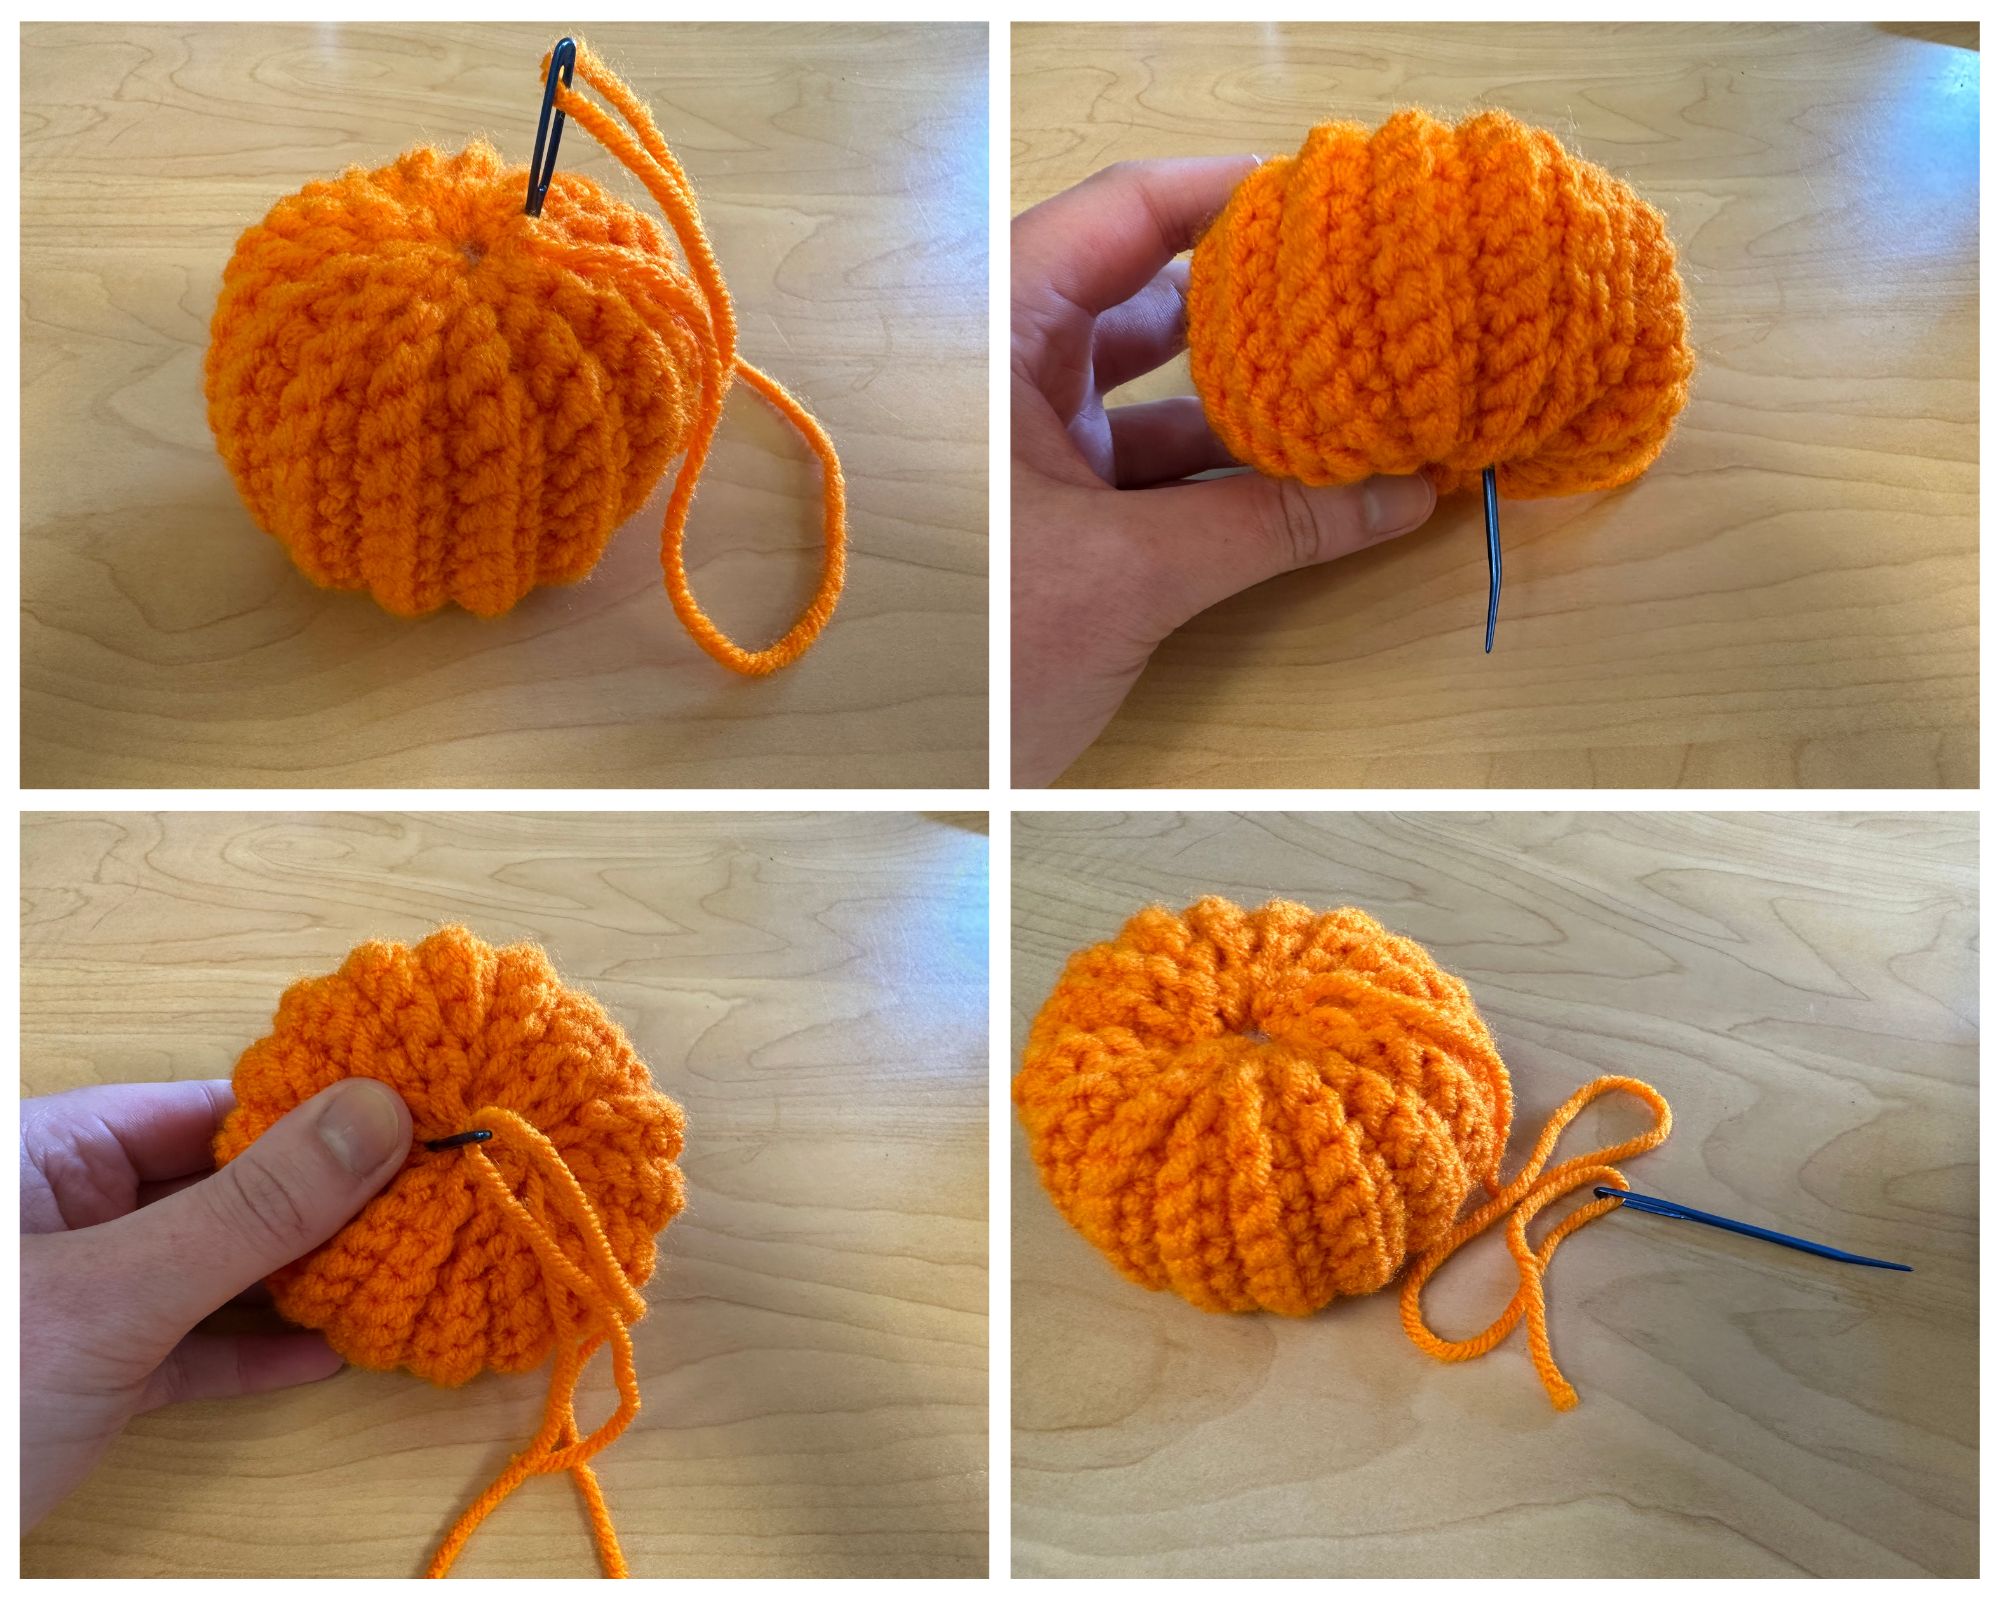
Optional: To give your pumpkin a more gourd-like shape, push the needle from the top of the pumpkin through to the bottom. Then, push the needle through to the top, coming out on the other side of the hole/opening. Pull until it gives your pumpkin the shape you want! Then fasten off.
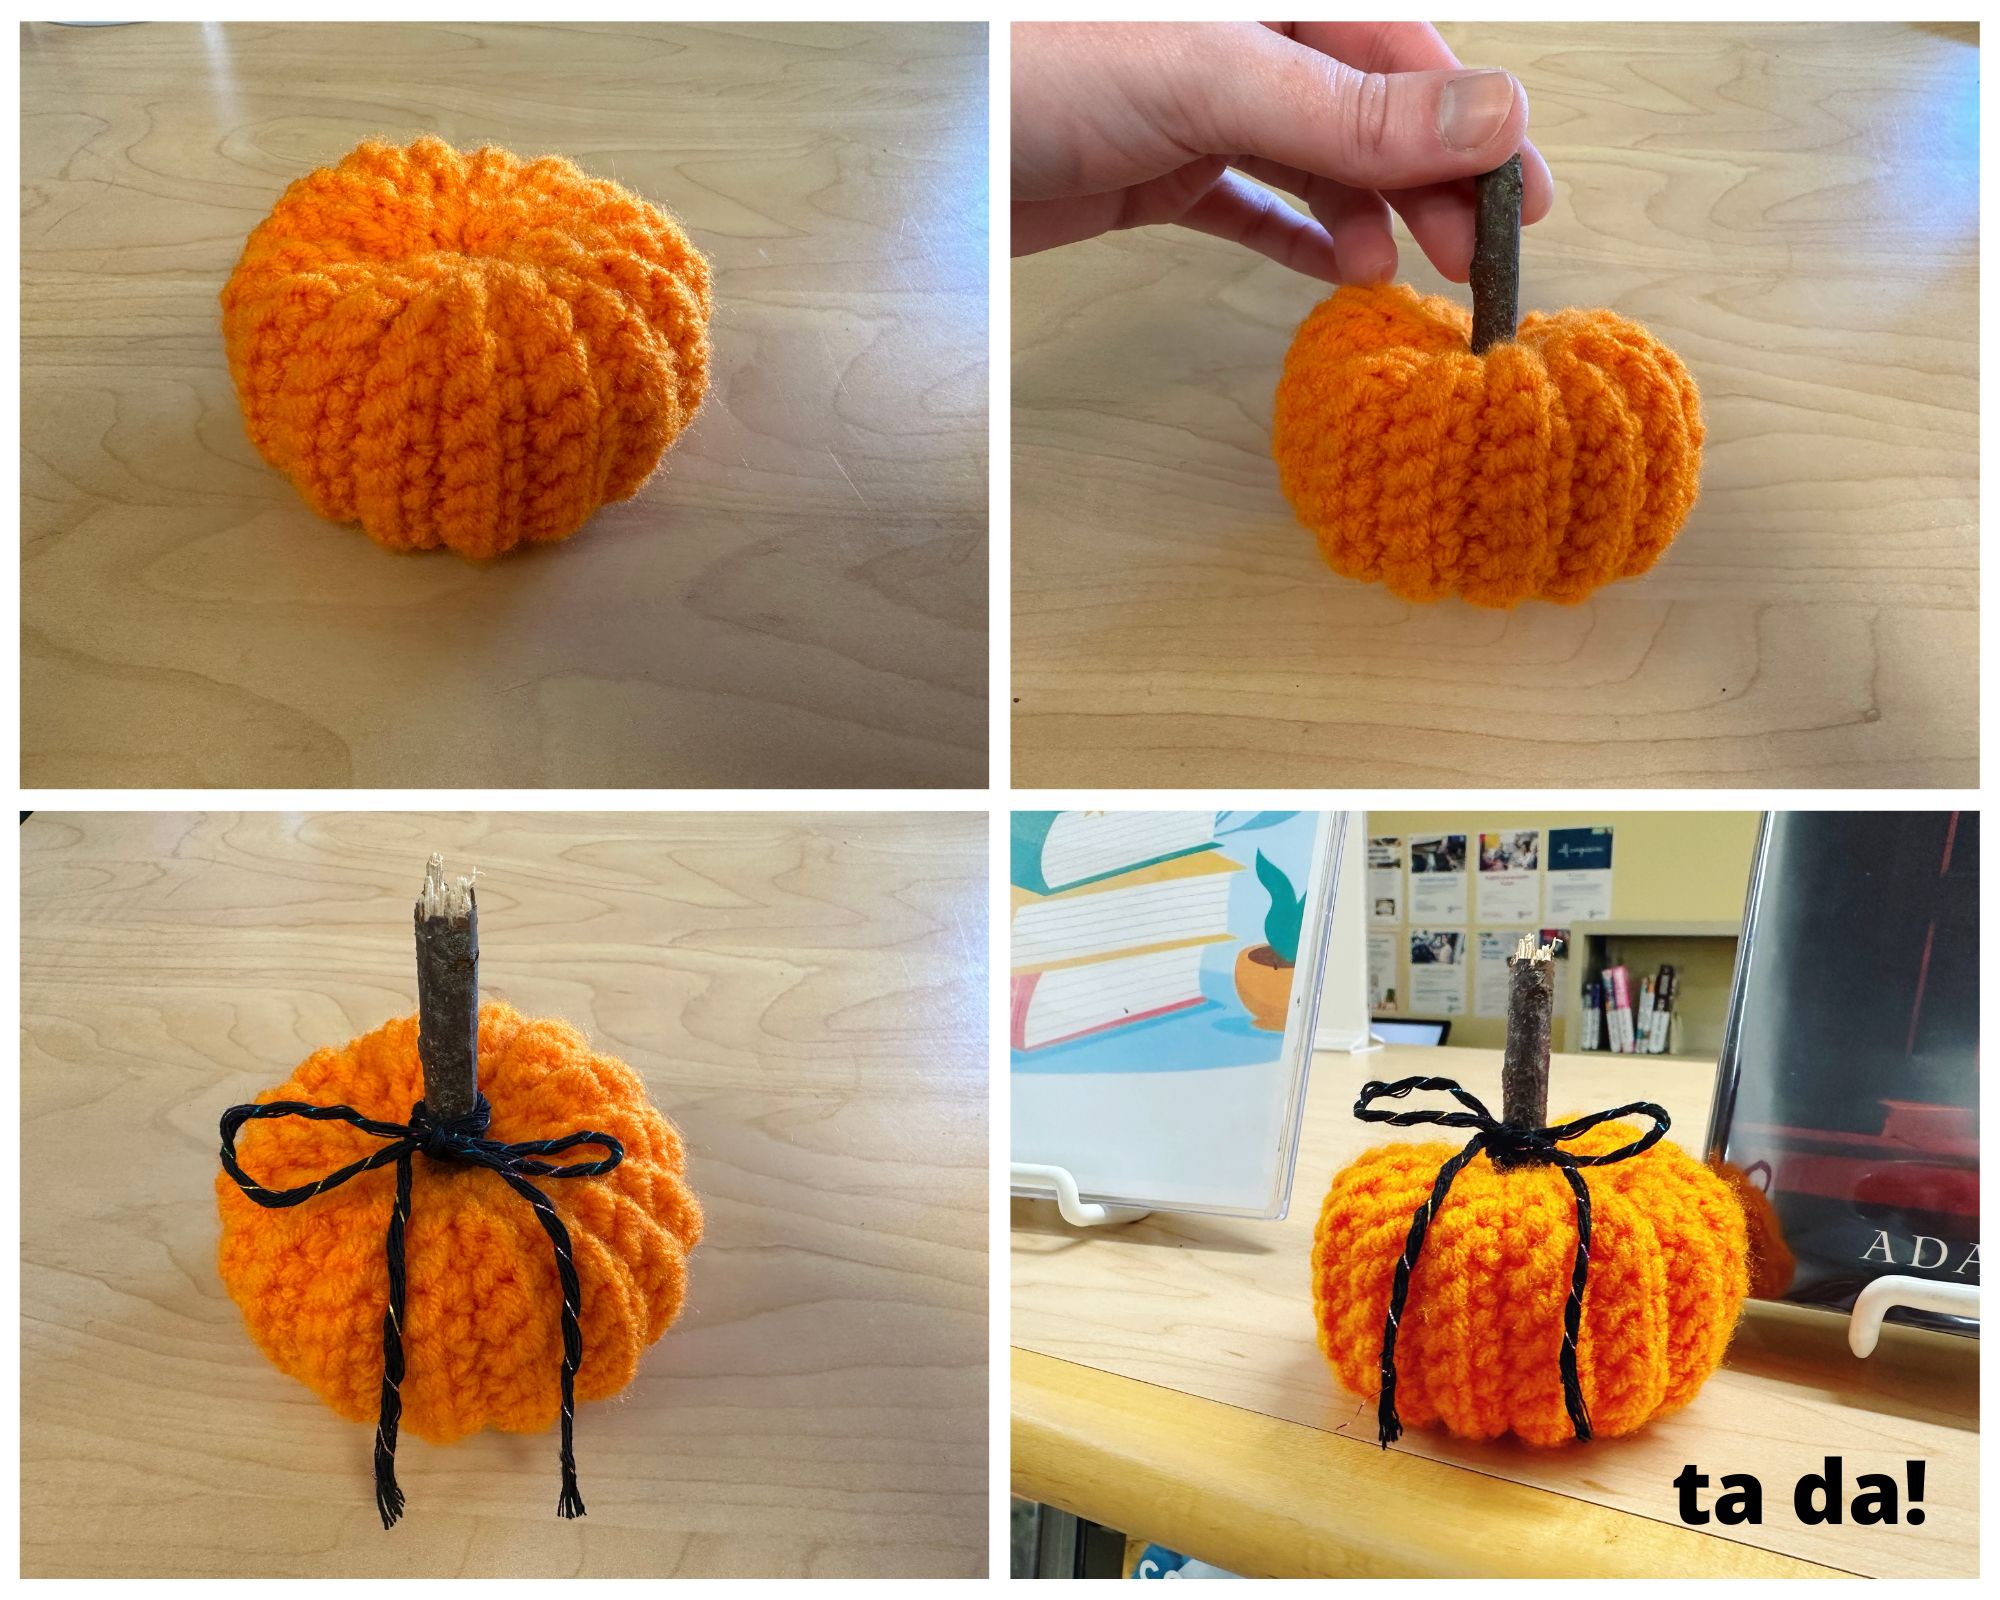
Next, get your stick! Optional: add some hot glue to the end of your stick. Insert into the opening at the top of the pumpkin. To finish, get your string or twine and wrap it around the stick. Tie in a bow.
Ta-da! Now you have your very own adorable little crochet pumpkin!
Crochet Pumpkin Text Pattern
Pattern
Row 1: Ch 16, leave long tail
Row 2: In 2nd ch from hook, sc across (15 st). Ch 1, turn.
Row 3-34: *In blo sc across (15 st), ch 1, turn* or until rectangle is desired size. Fo, leave long tail.
Finishing:
When your rectangle is the size you’d like, make sure both tails are on the same side. With the right side out, take the short sides of your rectangle and bring them together. Take one of the tails and sew the short sides together.
Once you’ve done that, your pumpkin should look like a tube. On one end of the tube, take the tail and needle and weave it in and out around the top. Pull tight. Then, sew the hole/opening closed and fasten off.
Stuff the pumpkin and then repeat the previous step on the other side. This time, however, do not sew the hole/opening closed. Instead, push your needle through from the top of the pumpkin down through the same spot on the bottom. Take the needle across to the other side of the opening and push back through to the top of the pumpkin. Pull. This will give your pumpkin a more gourd-like shape. Fasten off and weave in the tail.
Next, grab your stick or cinnamon stick. Optional: put hot glue on the end. Then, insert the stick into the opening at the top of your pumpkin and push down.
To finish, get your string or twine, wrap it around the stick a few times, and then tie in a bow!
Now you've got your very own crochet pumpkin!
Books About Crochet
This list includes crochet guidebooks for all levels, Halloween-themed crochet, and Christmas crochet.


Add a comment to: Easy Crochet Pumpkin Tutorial and Pattern